


| Expand All Collapse All |
You can move, resize and rotate objects you've put on to the map.
•Select the object by clicking it.
i.Move your cursor to the centre of the object. The cursor changes to look like this ii.Click and drag the object. iii.Release the mouse button when the object is where you want it. If you hold down the Shift button and then click and drag, you can restrict the movement of the object to only going up or down. |
-or-
•Press one of the arrow keys on your keyboard. As you press an arrow key the object will move one pixel at a time. |
1.Select the object by clicking it.
When the object is selected, Promap places a box with dashed lines around the object. Black squares known as sizing handles appear on the lines of the box.
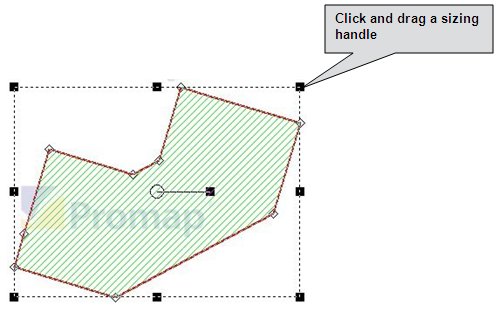
2.Place your cursor over one of these sizing handles and the cursor will change to show you in which direction you can resize the object, for example: ![]()
3.Click and drag the sizing handle to resize the object.
4.Release the mouse button when the object is the right size.
Note The aspect ratio is not maintained. The ratio of the object's width to its height will therefore change and the object may looked stretched. |
1.Select the object you wish to rotate by clicking it.
Look at the centre of the object and you will see a circle. Coming out of the circle is a thin black line and a small black box at the end of the line.

2.Place your cursor over the circle in the centre of the object and move it to the right until you see the cursor change to a circular arrow.
3.Click and drag the arrow to rotate your object.
4.As you rotate the object, you can see the angle of rotation in the Shape Information pop-up.
Tip Once you have hold of the rotation handle, you can make the rotation line longer by dragging it. A longer handle will give you more control over the rotation speed. |
See also
To select an overlapping object
To select an overlapping object